This post will outline how to trek Alta Via 2 (the southern half). I will provide details that include maps, costs, logistical requirements and facts as well as links to a full written narrative, photos and videos. This is a self-guided adventure on a shoestring or not (see cost breakdown for options). Follow the links to dig deeper into the adventure.
Difficulty Level:

I rate the southern section hard because it contains a number of difficult and scary cable runs (Ferratta) that really do require a harness, lanyards and caribiners and there are a number of isolated & very difficult passes to cross. Note that there are also some alternate routes but all in all it was still very difficult, tiring and scary at times. So don’t do it alone, and if at all possible, do not carry more than 5kg (which means you will need to stay in Rifugios rather than your own tent).
Part 2.1
Click to watch the Video
Part 2.2
Click to watch the Video
Part 2.3
Click to watch the Video
Part 2.4
Click to watch the Video
Link to Narrative and Photos Part 2
![]()
Total Cost Range of this Activity is: $$
Cost Details:
| Train/bus Trento to Marmalada Glacier (Penia or Pass Fedaia) Albergo/Refugio dorm per night $25 (x8) Breakfast included Meals (dinner x8 w/o drinks) Lunch (pack your own or pay minimum $10) |
$7 $200 $200 $80 |
| Total | $487 |
Note that I used my own tent and food for most of the trek so my expenses were much lower, however, I don’t recommend doing this. The terrain is too difficult to waste energy carrying a 15kg backpack. Go lite and enjoy the trek and Refugio services.

See Part 1 for additional maps and details.
Alta Via 2 – Route Map
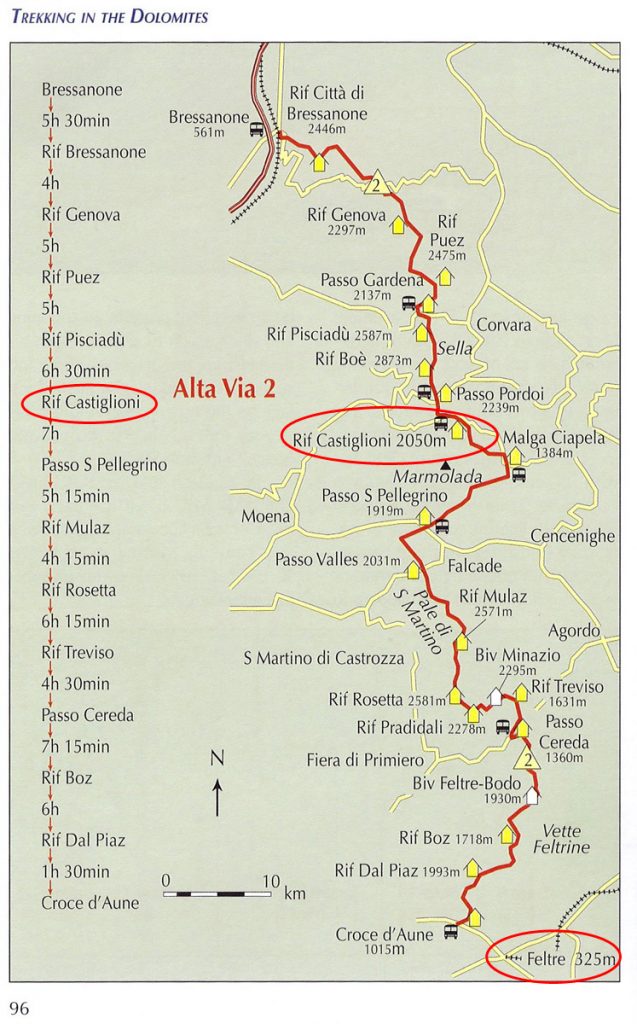
Alta Via 2 – Part 2 Stage Profile

My Trek Stages
Part 1
Day 1 Florence-Bressanone-Plose Ski Area, Tent
Day 2 Rifugio Genova, Dorm Bed
Day 3 Passo Garena, Tent
Day 4 Rifugio Boe, Dorm Bed
Day 5 Rifugio Castiglioni, Dorm Bed
Part 2
Day 1 Florence-Trento-Fedaia-Trail 605, Tent
Day 2 Rifugio Pian del Fiacconi, Marbalada, Dorm Bed
Day 3 Passo di Cirelle, Tent
Day 4 Rifuguio Passo di Valles, Dorm Bed
Day 5 Valle d Galline, Tent
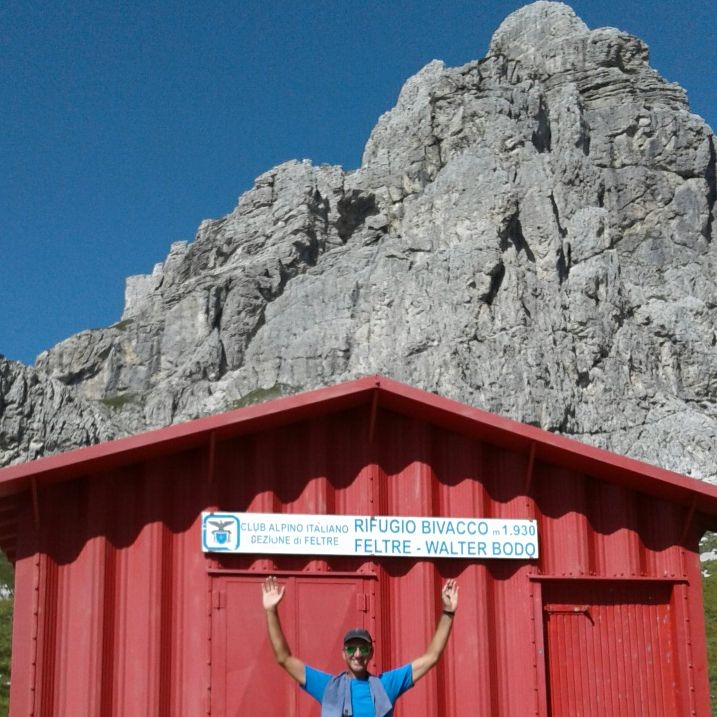
Day 6 Refugio Treviso, Dorm Bed
Day 7 Above Passo Cereda, Tent
Day 8 Orsera Camp, Tent
Day 9 Feltre
Link to Narrative and Photos Part 1
Link to Narrative and Photos part 2
Getting to the Trailhead Marmolada Glacier (Penia or Passo Fedaia)
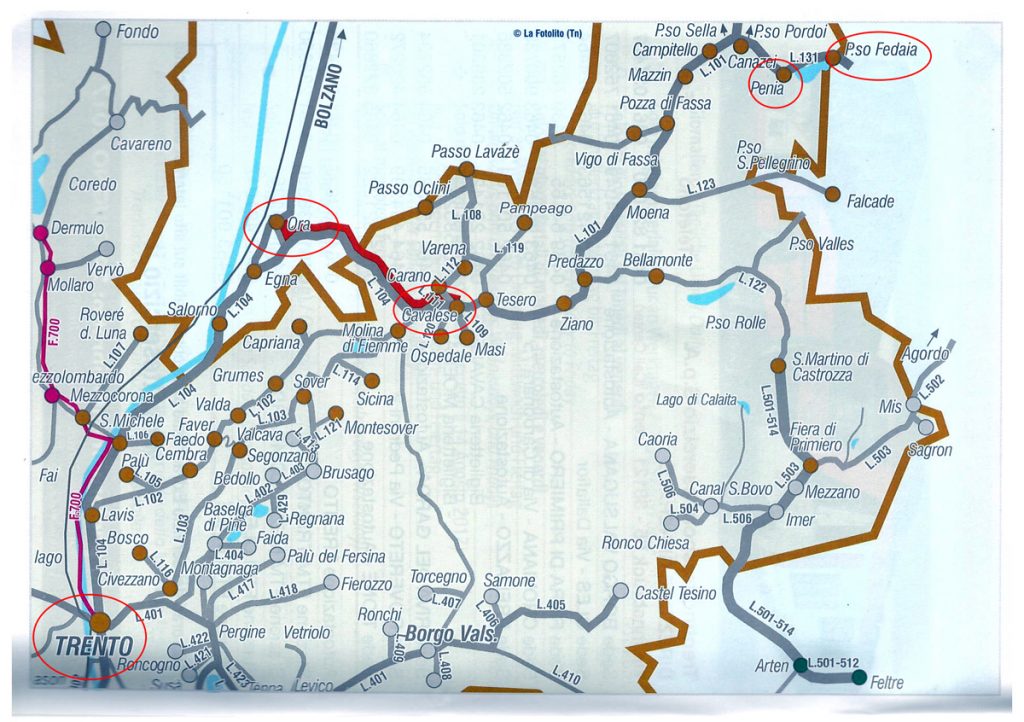
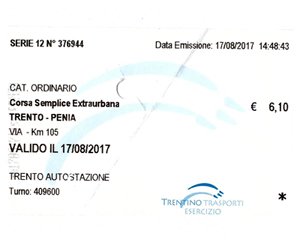 If using public transport the best option is to take a train to Trento then switch to either a bus or train/bus combinations. However, there is also a direct Dolomiti bus to Passo Fedaia but it has limited run times and times of the year. The Trento local transport option is more frequent but also has some limitations.
I paid around $7 to a ticket that gave me a train from Trento to Ora, a bus to Cavalese and another bus to Penia. Note that I was too late in the day to catch the additional bus through to Passo Fedaia (get off at the lake before the pass). See the trailhead transport page for train/bus specific details.
Note that crossing over the Marmolada pass is technical and very difficult. The trekking guide (see below) recommends a long circling route to the east (following the road network most of the way). This is safe and offers spectacular backside views of the Marmolada range. Another alternate is to start from Penia and follow a route 607 around the western side of the Marmolada range to Val Rosalia. The third and most difficult is to start from Rifugio Pian del Fiacconi (top of the lift) and skirt west into the 3rd valley, up the glass ice glacier (very slippery without crampons late in the season or after rains) and then climb to the western pass (via Ferratta that requires harness, lanyards and caribiners for both up to the pass and down over the other side. See photos for the extreme nature of this pass. This is the route used by all the climbers that wish to go to the top of Marmolada. They then clamber east along the ridge and then down the main glacier back into the valley (crampons and ropes required).
Marmolada Route Alternates

More Details
Good planning guide by GoHikeAlps.com
Required Equipment
Via Faratta – harness, lanyards, carabiners

Marmolada Pass – above plus crampons and ice axe
Trekking Guide Used- Trekking in the Dolomites
 This is the old version.
Map Used for Part 2 Trek

Link to Narrative and Photos part 2
Link to Narrative and Photos part 1